Securely pass pass column names to dynamically change result set from SP

I want to describe a secure way to pass a string-parameter containing a comma-separated list of column names to include in a result set. This can be useful when you’re often querying the same tables with the same predicates, but wish to include different columns in the result set for different purposes.

To setup our example, we’re going to use two tables in the AdventureWorks2022 database and the two tables Sales.SalesOrderHeader and Sales.SalesOrderDetail.

Our first version of the Stored Procedure has a fixed column list, so no dynamic columns in the result set.

Version 1 of our Stored Procedure

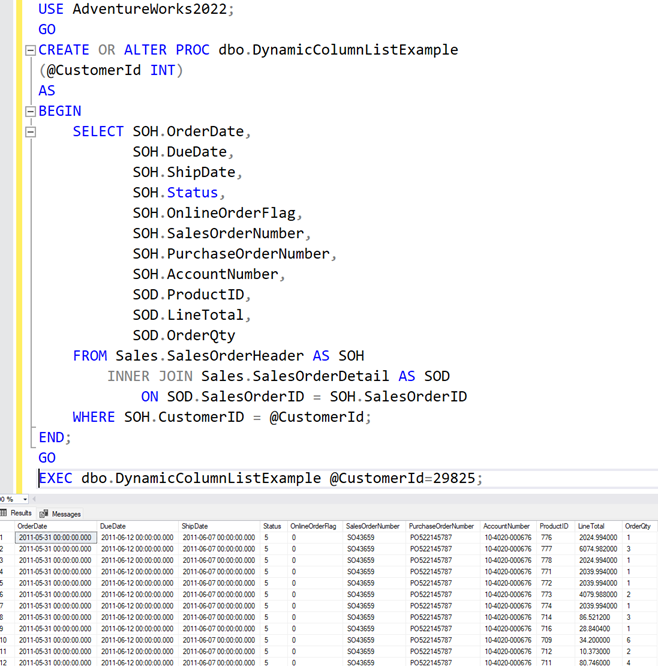
As you can see, we now have a stored procedure that returns some information about orders and line details.

Moving on, we now want to change this stored procedure, so that it can return a more dynamic column list. Perhaps some parts of an application isn’t interested in Totals at all, and other parts of an application isn’t interested in DueDate or ShipDate at all, but the query apart from that more or less the same.

Let’s start with an example of how NOT to do it. First the code, and then I will show why the below is really bad idea.

Some dynamic SQL to take care of dynamic column list.

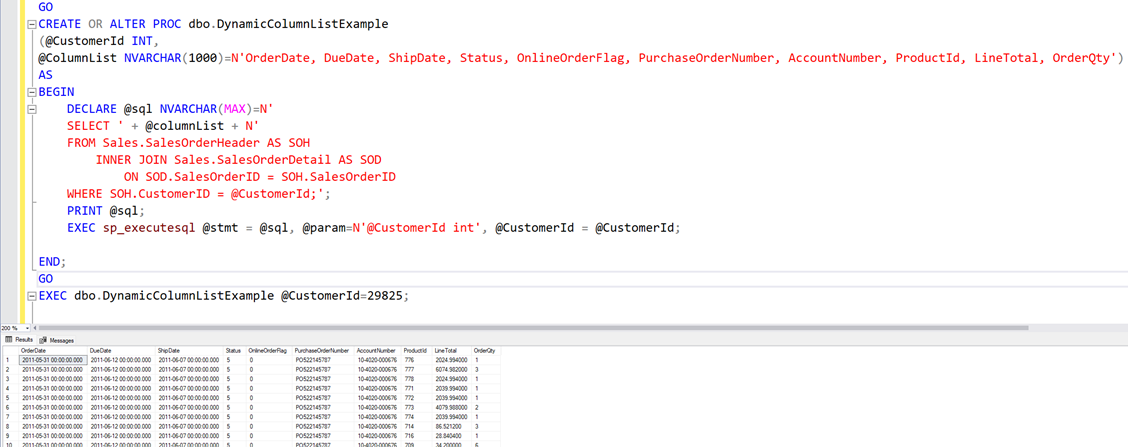
Although this works, sort of it opens up our database for SQL injection.
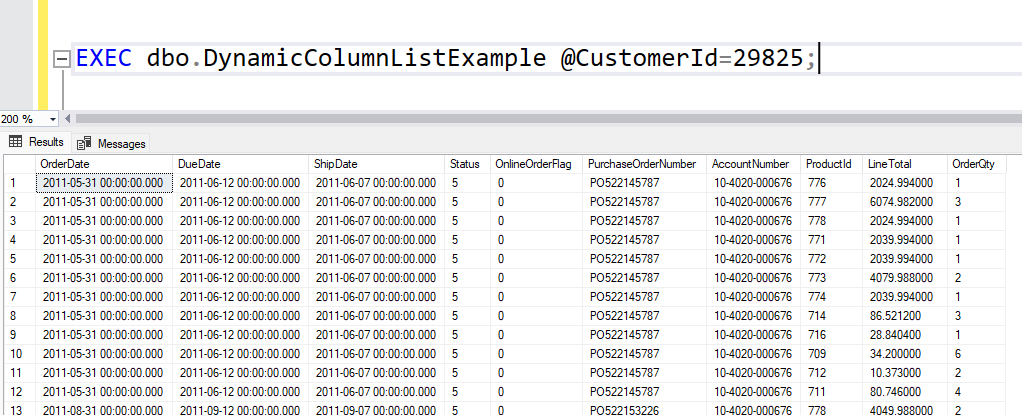
We can do this:

EXEC dbo.DynamicColumnListExample @CustomerId=29825, @ColumnList=N'OrderDate, ShipDate, OnlineOrderFlag';

And

 it will indeed give us the desired result set, with three columns.

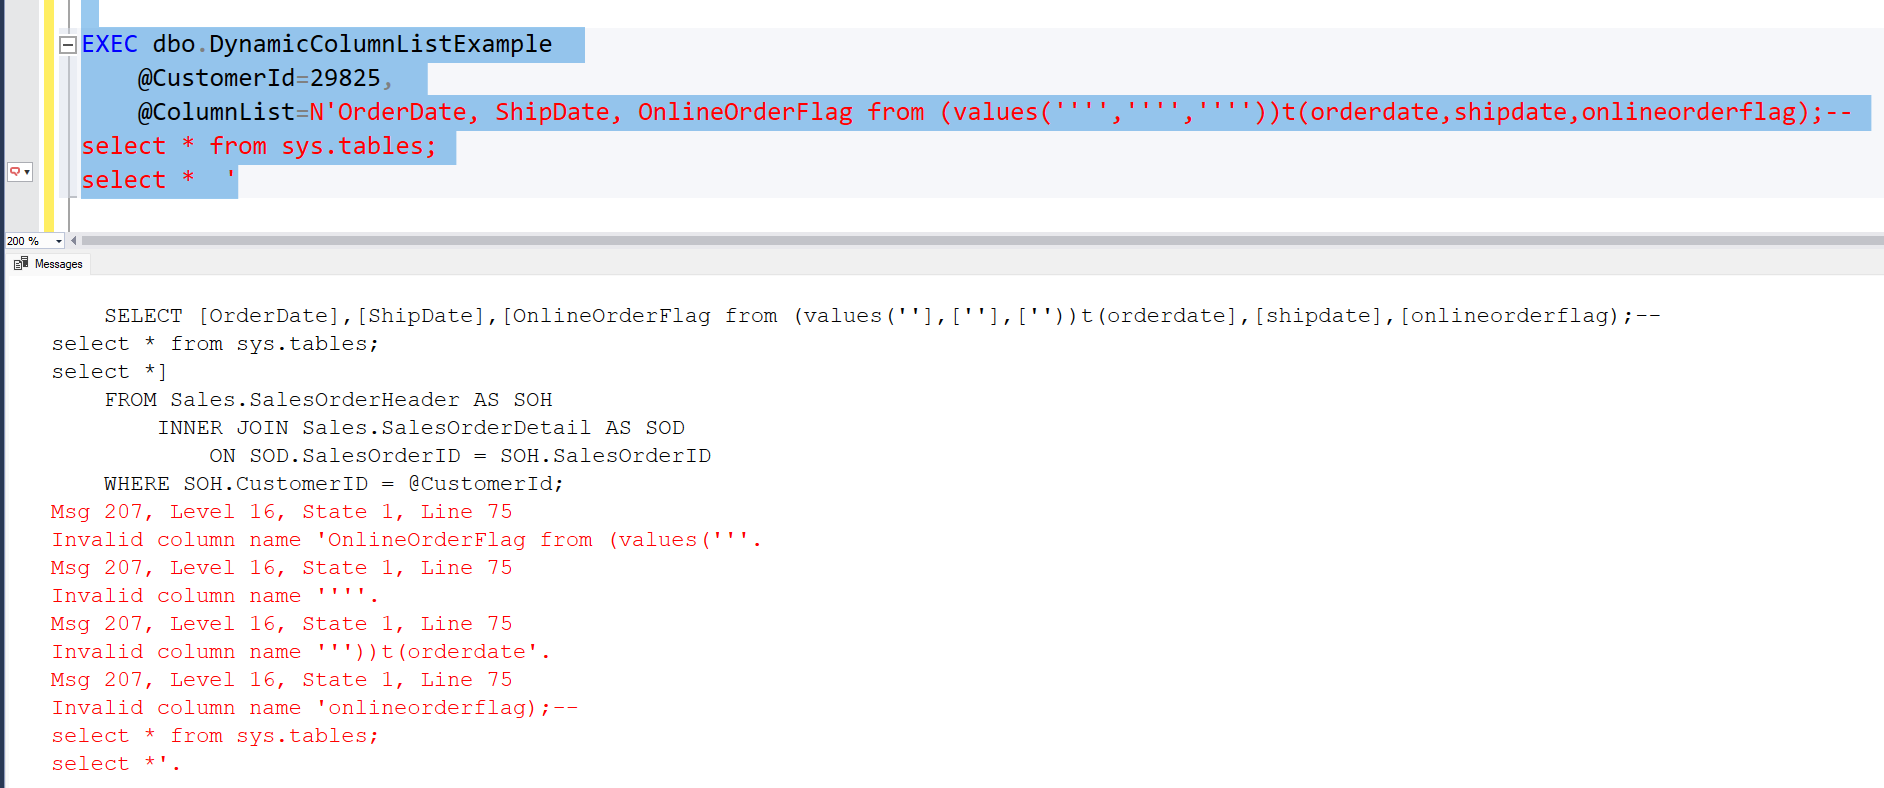
But we can also do this.

EXEC dbo.DynamicColumnListExample @CustomerId=29825, @ColumnList=N'OrderDate, ShipDate, OnlineOrderFlag from (values('''','''',''''))t(orderdate,shipdate,onlineorderflag);--
select * from sys.tables;
select *  '

Wait, what???!!!

This will generate the following SQL-statements and the Stored Procedure will happily execute them with sp_executesql.

SELECT OrderDate, ShipDate, OnlineOrderFlag from (values('','',''))t(orderdate,shipdate,onlineorderflag);--
select * from sys.tables;
select *  
    FROM Sales.SalesOrderHeader AS SOH
        INNER JOIN Sales.SalesOrderDetail AS SOD
            ON SOD.SalesOrderID = SOH.SalesOrderID
    WHERE SOH.CustomerID = @CustomerId;

So first a result set with three empty strings.

Then all the rows from sys.tables.

And finally all the columns from Sales.SalesOrderHeader and Sales.SalesOrderDetail for a given customer. Not at all what we were looking for, right?

But what if we still want to allow for dynamic column lists? We DO want to use dynamic SQL. But we can’t really do it this way. The way to secure this is to use the STRING_SPLIT function to convert the ColumnList parameter to a data set, and then convert it back to a comma separated list with STRING_AGG, but apply the QUOTENAME function to each element. Like this:

 DECLARE @columnListSecure NVARCHAR(MAX);
	SELECT @columNListSecure = STRING_AGG(QUOTENAME(TRIM(BOTH ' ' FROM value)),',')
	FROM STRING_SPLIT(@ColumnList,',') AS SS

And then we use columnListSecure instead of columnList to build our column list in the dynamic SQL-statement.

Our final procedure looks like this:

CREATE OR ALTER PROC dbo.DynamicColumnListExample
(
    @CustomerId INT,
    @ColumnList NVARCHAR(1000) = N'OrderDate, DueDate, ShipDate, Status, OnlineOrderFlag, PurchaseOrderNumber, AccountNumber, ProductId, LineTotal, OrderQty'
)
AS
BEGIN
    DECLARE @columnListSecure NVARCHAR(MAX);
    SELECT @columnListSecure = STRING_AGG(QUOTENAME(TRIM(BOTH ' ' FROM value)), ',')
    FROM STRING_SPLIT(@ColumnList, ',') AS SS;
    DECLARE @sql NVARCHAR(MAX)
        = N'
	SELECT ' + @columnListSecure
          + N'
    FROM Sales.SalesOrderHeader AS SOH
        INNER JOIN Sales.SalesOrderDetail AS SOD
            ON SOD.SalesOrderID = SOH.SalesOrderID
    WHERE SOH.CustomerID = @CustomerId;';
    PRINT @sql;
    EXEC sp_executesql @stmt = @sql,
                       @param = N'@CustomerId int',
                       @CustomerId = @CustomerId;

END;

Let’s test it. First without a column list. Then using a column list with good intentions. And finally a column list with bad intentions.

Works like before
Also works like before
Haha evil hacker, here are a couple of error messages for you!

As you can see from the printed SQL-statement, all the column identifiers are quoted and the error messages we get are that there are no columns named “OnlineOrderFlag from (values(”” etc. Meaning all the malicious code that was sent into the column list is translated to quoted identifiers which when used as part of our column list gives error messages. So we stopped an attacker from using a dynamic SQL injection vulnerability.

Read more about SQL Injection and other vulnerabilities on OWASP Top Ten: OWASP Top Ten | OWASP Foundation

Stream Teams meeting to YouTube

Recently, I started streaming SQL Friday directly to YouTube. The speaker still connect to a Teams meeting and then I use OBS Studio to create scenes with components from the Teams call together with a Title bar etc, and stream from OBS Studio directly to YouTube.

Since I struggled a little bit with getting all the bits and pieces right (and perhaps I still have some tuning to do), I wanted to write this blog post, in case anyone search for a way to do the same.

First – setup NDI for your Teams computer

NDI, short for Network Device Interface, is a broadcasting technology that broadcasts streams from cameras and other devices to the local network. Teams has built-in capabilities for NDI broadcasts, but you will need some NDI drivers. These drivers can be downloaded from https://ndi.video/download-ndi-sdk/. Downloading the NDI SDK should be enough. You will need this software on the computer where you run your Teams client as well as on the computer where you run OBS Studio. In my case, it’s the same computer, but you may just as well connect to Teams from your laptop, and use OBS on a seperate production computer.

Once you have installed the SDK, you need to configure your Teams user, to allow it to broadcast with NDI. This is done in the Teams Admin portal, by changing existing or creating new meeting policy and assign it to the users who should be allowed to use NDI broadcast.

This admin-page is in swedish, but just open meeting policy and go down to Audio and Viewo and select the NDI/SDI-option.

Next step is to configure the Teams client.

SO FAR, NEW TEAMS CLIENT HAS VERY LIMITED SUPPORT FOR NDI BROADCASTS

So I stick to the classic/old Teams client. There, you enable NDI for yourself by clicking the three-dot-menu next to your profile picture, and select Settings. Under settings, you go to the App Permissions tab, and there you should find this setting.

Now you’re almost done with the NDI setup in Teams. Last step is to start broadcasting when you’re in a meeting. So start the meeting, select “… More” and enable Broadcast via NDI under the Broadcast menu (above the recording menu). If you don’t see it, make sure your Teams admin have enabled NDI and that you yourself have enabled NDI for yourself in Teams.

Next up – configure NDI in your OBS Studio computer

For the computer where you run OBS Studio, you also need to install the NDI SDK (see the previous section). I went for the full Tools-suite, but that’s not really necessary. If you run OBS Studio on the same computer as Teams, you’re all done.

Once we have the NDI-SDK in our OBS Studio computer, we need to install the NDI-Plugin for OBS Studio. You can do that from the OBS Project Plugins forum.

Now we’re ready to start configuring our NDI sources. The easiest way to do it is to start a Teams call with someone, start the NDI broadcast in Teams and then go into OBS Studio to create a scene.

In your OBS Studio Scene, click the Plus sign to add a new source. This will bring up this menu:

Again, swedish, but the symbols are universal. Select “NDI(tm)Source”
Give the source a meaningful name and hit OK.
After hitting OK, you will start configuring the source. If your Teams call is broadcasting with NDI, you will be able to select your own camera, other participants’s cameras and whatever is shared by any of the participants.

One thing I realised late into the game is the Audio Video sync settings of an NDI source. The default is “Source Timing”. Change it to “Network” and you will most probably notice a remarkable improvement in audio quality from your Teams call. Also the sync itself actually works. If you get this wrong, chances are your stream from OBS Studio will get the audio sources mistimed, which makes for a quite funny way to follow conversations between two parties…

Network is the way to go here.

For the rest, it’s going to come down to your creativity in setting up the scenes in OBS Studio. I will leave that up to you.

Lastly – stream to YouTube

To stream to YouTube, you need a YouTube channel. If you already have that, you’re basically good to go. In OBS Studio, choose the stream settings over here.

So start by opening “Settings” and configure your Sterams.

Here you connect your YouTube account in OBS Studio, and then you can start creating or connecting to planned Live Streams.

With your YouTube account connected, you choose to manage streams in the lower right-hand corner of OBS Studio.

It’s “Hantera sändning” in swedish. You’ll figure out where that button is in whatever language you use.

Now you can either create a new Live-stream, or select an existing one from your connected YouTube account. The settings if you choose to create a new Live Stream are pretty much the same you will find in YouTube Studio, so I’m not going to explain them in detail. Once you’re done selecting or creating your Live Stream and select it, you’re ready to start streaming.

When you have selected a Live Stream to connect to, you can start streaming.

DONE! Or maybe not

I’m sure you, as I, will run into some technical difficulties with NDI/OBS Studio/YouTube. You can see my results, and how they evolve over time on my YouTube-channel. SQL Friday Season 8 is the first playlist where I started live streaming the event. (1) SQL Friday Season 8 – YouTube

Good luck! Let me know if I made any obvious mistakes in this post, and also let me know about your progress.

Personally, I feel like I live in the feature. Live streaming to a global audience, from my own office room. Wow.

EXECUTE AS to test permissions

As a security-aware developer, you want the application services to be able to do exactly what they are supposed to do. Not more, not less. To test this, you can impersonate a login and see that the login has exactly the permissions you intend for it to have.

This is done using either execute as login or execute as user. In this post, I will show a few use cases for execute as user.

Let’s start with an example where we test the permissions for a given SQL Server Table.

-- Setup the database user. I'm testing with a user without login here.
CREATE USER PermTest WITHOUT LOGIN;
-- Create a Customer Table
CREATE TABLE dbo.Customer(
	CustomerId int identity(1,1) CONSTRAINT PK_Customer PRIMARY KEY CLUSTERED,
	CustomerName nvarchar(100) NOT NULL,
	CustomerRegion nvarchar(100) NOT NULL,
	CustomerRating tinyint CONSTRAINT DF_Customer_CustomerRating DEFAULT (3),
		CONSTRAINT CK_Customer_CustomerRating_1_to_5 CHECK (CustomerRating >0 and CustomerRating <6)
) WITH (DATA_COMPRESSION=PAGE);

-- Give PermTest permission to read columns CustomerId, CustomerName and CustomerRegion but not CustomerRating
-- Now we test permissions, with EXECUTE AS
EXECUTE AS USER='PermTest';
	-- Test that PermTest can't read all columns
	SELECT * FROM dbo.Customer;
	-- Test that PermTest can read the columns it should be able to read.
	SELECT 
		CustomerId,
		CustomerName,
		CustomerRegion
	FROM dbo.Customer;
	-- Test if permissions can be "fooled"
	SELECT CustomerId 
	FROM dbo.Customer 
	WHERE CustomerRating = 2;
REVERT; 

Lines 14 and 27 is where the “magic” happens. Or rather where impersonation starts and stops. With EXECUTE AS USER=’PermTest’, our session impersonates the PermTest user and with the REVERT command, we switch back to our logged in user context.

The first test case will fail. The second will succeed and the third will fail.

Now let’s complicate things with some row-level security.

CREATE SCHEMA Security;
GO
-- Create the security predicate function
CREATE OR ALTER FUNCTION Security.UserRLSPredicate(@User as nvarchar(100))
RETURNS TABLE 
WITH SCHEMABINDING
AS 
RETURN SELECT 1 as RLSPredicateResult
WHERE @User = USER_NAME() OR USER_NAME()='dbo'
GO
-- Apply the security predicate using a security policy on table dbo.Customer
CREATE SECURITY POLICY RLSCustomerSalesRep
ADD FILTER PREDICATE Security.UserRLSPredicate(SalesRep)
ON dbo.Customer
WITH(STATE=ON);
GO
-- Finally we GRANT SELECT on the whole table to PermTest. The user should now see the rating, but only for their own customers.
-- First REVOKE existing permissions and then add only what we need.
REVOKE SELECT ON dbo.Customer TO PermTest;
GRANT SELECT ON dbo.Customer TO PermTest;

-- Now test if I as db_owner can see everything
SELECT * FROM dbo.Customer;

-- And finally test that Row Level Security predicate works
EXECUTE AS USER='PermTest'
SELECT * FROM dbo.Customer;
REVERT 

These are some simple test cases using EXECUTE AS. They are somewhat silly, especially the predicate function – it should probably use metadata stored in tables instead of going straight at SalesRep = user-name. But that’s for you to figure out in your application. Using EXECUTE AS, you’re at least able to test if your permission structure works or not.

Final words: Don’t just give service accounts db_datareader, db_datawriter and EXECUTE (or even worse, db_owner) permissions. Unless that’s exactly what the service needs to be able to do. Give your service accounts just the right permissions, and test your security. A more advanced topic is to create stored procedures to elevate permissions for specific tasks, but that’s a bigger topic. One that Erland Sommarskog has written plenty about: Packaging Permissions in Stored Procedures (sommarskog.se)